7

New Year’s special!: Transforming a cheap plain planner into a unique one!

Hey there everyone!

First of all I’d like to apologize for losing track of keeping up with my blog. =o I’ve been working really hard at youtube and my day to day job aswell. (Yay, I found a job!) But with the new year that just started, I made it one of my many resolutions. ;)

Speaking of the new year! I’ve decided to make a video on how to turn a plain & cheap planner into a more unique and personalised one. This keeping in mind that not anyone can afford a filofax or expensive planner. There’s nothing more fun than experimenting and trying to be a creative planner on a budget!

The planner I chose was a simple planner from ‘HEMA’, one of my favorite stores. It was around 6 euros, so very inexpensive. Then I decided tot transform it! If you wanna see how I did that, watch the video down below! ;)

I hope you enjoyed watching the video! Maybe it gave you some ideas for planning on a budget too! :3 Thanks for watching and supporting me!

See you!

signature


4

DIY Midori traveler’s notebook passport sized FOLDER

Hey there! :D

I’m back with another video! I’ve been very busy lately with my last studentjob. =o and haven’t been able to make as many videos and content as I usually do.. Sorry for that! I do try to get a video out every week! ;)

In the video I have for you this time I show you how I make a paper folder for my Passport sized traveler’s notebook (which is in this case a paperdori). ;) It’s so handy to store stickers, bills, pictures,… :D If you’re interested and want to make on yourself, it’s very easy! ;) First of all, here’s a picture !
IMG_1187

Feel free to check out the video here!

That’s it for this update! :D I hope everyone had a nice weekend and a great week! ;)

signature

13

DIY Feltdori! (Felt traveler’s notebook)

Hey there! :D

I’m super excited and happy to share with you guys that I made my first “Feltdori” ever & filmed it! Even though I knew it was going to be clumsy (first time afterall) I decided to film it to put it on my youtube channel! ;) I’m very happy with how it turned out and feel like the color of the felt I picked matches well with my personality. :3

Those of you that are following me on instagram know that my “Midori traveler’s notebook inserts” finnaly arrived! :D You’ll be seeing lots of decorations of those on instagram in the future! ;3 More about those inserts later! But yess, so you can tell there has been some changes in my little plannerworld! But I am very happy! :D The biggest change is going from a passportsized dori (paperdori) to a regular size feltdori! But we’ll see how that goes. ;)

For now! Here are some pictures of how the “Feltdori” turned out!

IMG_1232
Instead of a charm, this time I added a cute yellow button with white polkadots! :D It definitely represents my love for polkadots doesn’t it? :p
IMG_1235
I’m very curious to know what you guys think of my new feltdori? :D Let me know in the comments below!

Now for the video! Here’s a link to the DIY video on how I made it from scratch! If you decide to try it out I wish you good luck! And as always, I would LOVE to see how your feltdori looks like! :3 It’s always fun to see you guys making things from my DIY videos!

I hope you enjoyed watching the video & reading my post! ;) Have a great day!!

signature

24

My HEMA handmade Stamps!

Hey there!

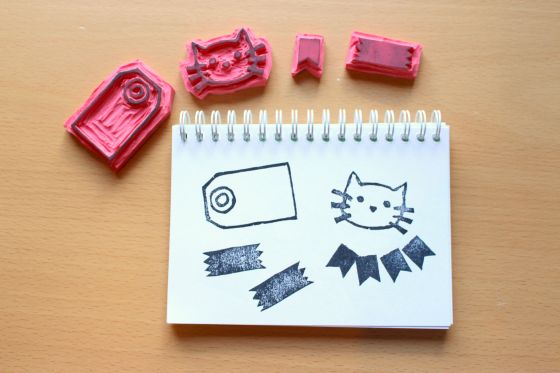
In my last video & blogpost I shared with you some of the things I bought at HEMA and a craft store! One of the things was the DIY Stamp set! So of course I would love to share with you the stamps I made! :D Here’s a picture!

IMG_0969
I made these stamps out of 2 rubbers! I started with the tag one! :D I thought it would be fun to have a tag stamp to use for journaling, snailmail & more! I have to say , it was quite tricky at first! (also since I’m not a perfectionist) With the leftover from that ruber I also carved a “Tape stamp”! With the other rubber I carved a big cat and a little flag stamp! The stamp and tape stamp would definitely be fun to use in different colors! :D I didn’t want to throw away leftover rubber, therefore I carved those small ones too!

Making my own stamps was a lot of fun! :D Although I did hurt myself in the process.. :p (suprise, suprise)! I would definitely recommend you try out this DIY stamp set! It’s so much fun! I would love to see what kind of stamps you all make! ;) Well, that concludes this little stamp making update! You will definitely see me using these in the future, and probably making more! Have a great weekend! :D

Ps: That cute card set giveaway is still going on! Check out the post about it here: https://jumpyjess.wordpress.com/2015/07/15/craft-store-hema-haul-giveaway/ 

signature

11

DIY Paperdori! (Paper passport Traveler’s Notebook)

Hey there! :D

I’m back with the video that I promised you!! So you all know I’ve made my own passport sized paperdori about 2 weeks ago, and have been using it as my planner! (That setupvideo is already online :D) And I planned on making you a DIY video of how I made my paperdori! So here it is! So if you’re looking for an alternative to leather notebooks or just a cheaper dori in general, this is perfect for you! You can use your favorite scrapbook paper and turn it into your own unique paperdori! :D I had so much fun making another paperdori! This time with the travel theme! Here’s a closeup:

IMG_0922
I’m very happy with how it turned out, despite all my clumsiness.. (if you watch the video, you’ll get what I mean). :p
If you want to try making one yourself check out the video down below! :D I hope you’ll enjoy it as much as I did making it!

signature

10

DIY Turn your Passport case into a “Midori Traveler’s Notebook”!

Hey there! :3 To make up for the mini-hiatues I’ m posting some more this week, as you might have noticed! I did a little experiment on a lovely passport case I found at the “Flying Tiger shop” for 2 euros! It fit the traveler’s theme so well that I decided to try to turn it into a traveler’s notebook! And here are some pictures of how it turned out! :

IMG_0780

IMG_0778

IMG_0775

I’m pretty happy with how it turned out! :) I didn’t have any other color elastic, but I feel like it fits well! What do you think about this Converted Passport case? I would love to hear!

If you’d like to know how I did it, check out the video down below! It’s an easy DIY and you don’t need much! When you happen to stumble on that one great passport case, you could try it out! I would love to see what yours would end up like! :) Thanks everybody for the support and enjoy the video!

signature

19

DIY Panda Planner Dashboard

Hey there!
As you know I try to get a video out every week, so here’s this week’s video! In the video I show you how to make an easy cute Panda planner dashboard! The one I’m making is for a Pocket filofax planner, but you can make it for whichever size you’d like! Here’s a picture of the dashboard:

IMG_0670

So for those who would like to see how I made this cute dashboard, I’ll put the video here below! Have fun watching it! :D I hope you guys like it! If you wanna see more crafting&planner videos subscribe! Bye!

PS: I am seriously getting frustrated by the lighting in this video or my pictures. I really hope to invest in some good lighting in the future for better quality pictures and videos!! :)

signature

17

DIY Happy Easter card!

IMG_0470

Hey there!

You must be thinking, “Jessica, are you posting 2 times a day now?”. Nope, it’s a coincidence! And there is only one explanation! I actually forgot to post my DIY easter card, and it would be silly to wait till After Easter right? I normally don’t forget these kind of things though. BUT this week was the game release of “Mario Party 10”, which my and my boyfriend waited for , for months! We might’ve played non-stop? (It’s SOOO MUCH FUN) It’s a game mostly based on luck, and then some skill in minigames. The only sad thing about it is… “I have the WORST luck!” We played hours in a row (the number might scare you :p), and I didn’t win once. It seems impossible. :'( Anyway!

NOW FOR THE DIY!

Here’s the materials you’ll need: Scissors, fork, cute scrapbookpaper, ribbon, glue, clear nailpolish, a pen and white paper!

IMG_0456

IMG_0459

  1. Make or fold your white card base (whatever size you like!)
  2. cut out some small eggs, whatever size and number.
  3. Glue the paper eggs on the white card front.
  4. Make some cute ribbon bows using a fork! I actually found this technique on pinterest! :o Check it here: https://www.pinterest.com/pin/325455510546877272/
  5. Glue the bows on top of the paper eggs (I used crafting glue).

IMG_0460

  1. Finish it with a “Happy easter sentence”!
  2. DONE!

It is very simple to make! I had a lot of fun making them! ;) Tell me what you think about it!

HAPPY EASTER EVERYBODY! :D

signature

30

DIY Planner pocket!

BeFunky_BeFunky_IMG_0395.jpg

Hey lovelies!

I’m back with another planner related DIY! This time I’m showing you how to make a cute small pocket to fit in your divider! You all know I love making my planner more unique and am always trying to find more ways to do so. Then I came up with the idea of a small pocket that could fit small notes and cards. If you wanna see how I made it, check out the video below! Feel free to give it a thumbs up and subscribe if you like it! ;) Support is always welcome! Let me know what you guys think! :) Enjoy!

That’s it for this little “pocket DIY” I hope you enjoyed watching it!
PS: I will be uploading my “Kikki K planner setup” SOON! Watch out for that, if you’re interested! Bye!

Instagram: https://instagram.com/jumpyjessicap/
Youtube: https://www.youtube.com/channel/UCIS0sQCVFUjBt2Z7IRToPPA

signature

24

DIY Washi tape Cards!

BeFunky_IMG_0324.jpg

Hey there! I’m back with another DIY video! This time it’s washi tape greeting cards! ;) As you all know I am crazy about washi tape. All those colors, patterns, everything about them just cheers me up! Especially when I get to use them for DIY’s like this or decorating my planners! Check out the video below if you want to see how I made these washi tape cards!

Thank you for all the support! I’ve reached 100 followers yesterday, and am super excited about this! I just want to blog and vlog more now! Thanks guys!

signature